|
Microsoft® Front Page is a powerful tool with which you can create some very impressive web pages without having to know much about HTML or any other web site coding language. Every time you add an image or type something into your web pages, Front Page automatically takes care of the HTML for you. You can create a sophisticated web site without ever having to look at the HTML tab at the bottom of your Front Page screen. To add an ICRA label however, you need to.
This page takes you through the process step by step and includes screen shots taken from Front Page 2000. Earlier versions may differ but the principles remain the same. If you're unsure about any of the terminology used on this page, please refer to the quick guide The help page here has been written for users with little or no experience of web authoring or wider computer knowledge. Where appropriate, tips for more advanced users have been included. The main piece of information relevant to more advanced users of Front Page is Don't just copy and paste the ICRA meta tag directly into the HTML source code. Click here to skip to the crucial section. N.B. This page is newly published (28 March 2001). We welcome feedback on the usefulness and accuracy of this information. |
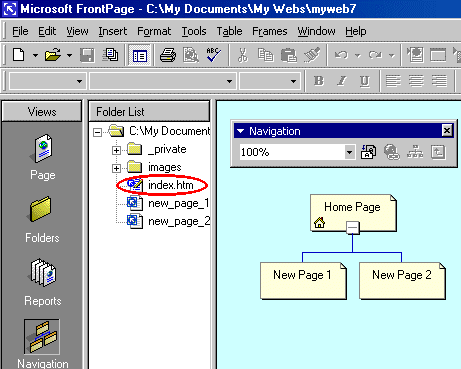
| I've created a simple 3 page web site with a home page and 2 pages off that as shown below: |

|
For demonstration purposes, I'll take the simplest case - a single ICRA label which is going to be applied to the whole site. This needs to go in the file Front Page has created for you called index.htm. There's a potential point of confusion about the differences between a home page, a splash page, a frameset, a default file - these terms all have their uses but the important thing here is that whatever "friendly" name you or Front Page uses for it, the key file is called index.htm which is why I've highlighted it above. Select that file by double clicking it in the Folder List.
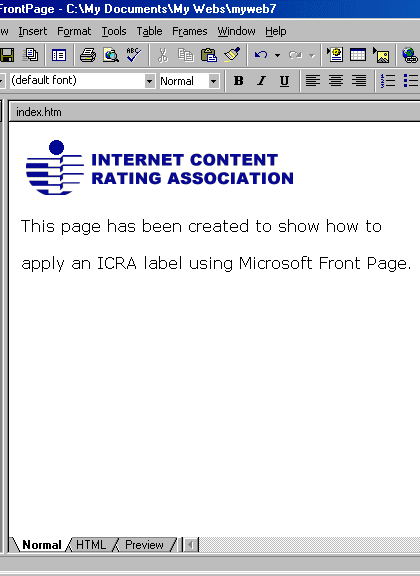
In this simple case, I've added a graphic and some text to the page as shown below: |
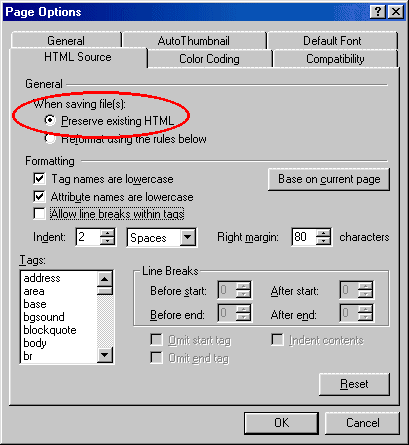
| Now click Tools > Page Options, then click the HTML Source tab to bring up the dialogue box shown below: |
|
Make sure that the "Preserve Existing HTML" option is selected. Then click OK.
This is very important for when our system checks that our label is in place! Any changes which Front Page makes to the label are likely to generate a "Label Not Found" error and a series of e-mails which you'd rather not get! Advanced users: If you want to use different settings on this dialogue box, that's entirely up to you of course. However, there are limitations on the number and position of line breaks allowed. See Step 1 of the basic procedure in FAQ 3.1 for details. Now you're ready to copy and paste your label into the HTML source code of your site. Open the e-mail we sent you when you rated your site which will look similar to the one shown below. N.B. I'm using the e-mail copy of the ICRA label, not the version presented to you at the end of the rating seuqence. That's because although they look the same, behind the scenes they're using different protocols to display the same text. Click and drag your mouse to highlight the label as shown: |

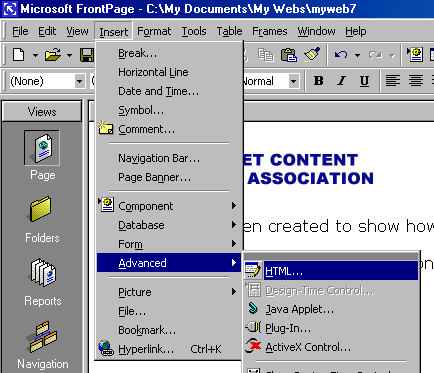
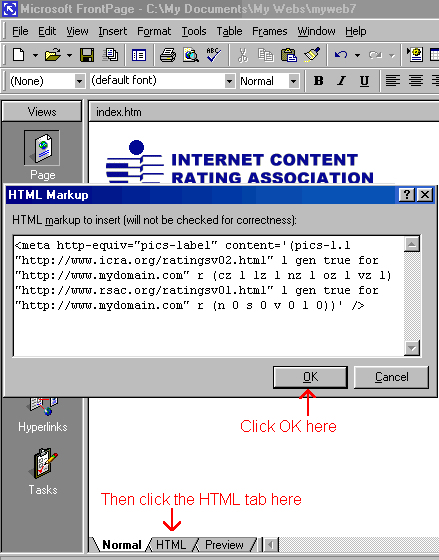
| Now press Ctrl+V to paste the label from your computer's clipboard into the window that has just opened, then click OK and select the HTML tab as shown below: |
|
If this is the first time you've see the HTML source code for your site, don't panic! We just need to carry out a couple more steps and the job will be done.
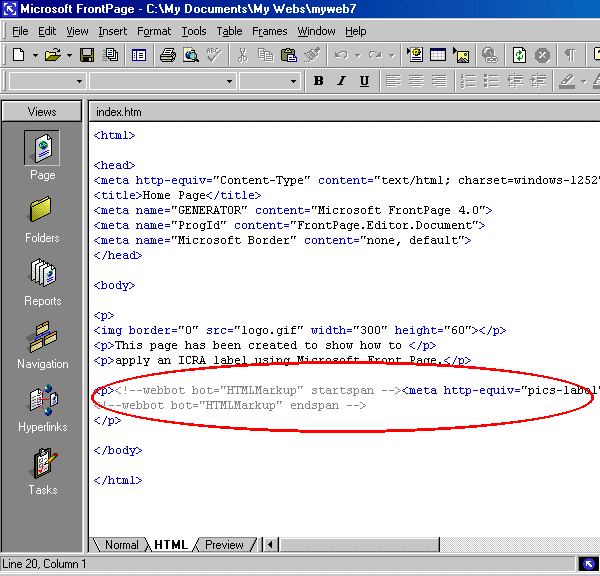
The code for this simple demonstration page is shown below with the key elements circled. Your site will have more HTML code than this! |
|
Advanced users Yes, it's in the wrong place for the time being ... patience!
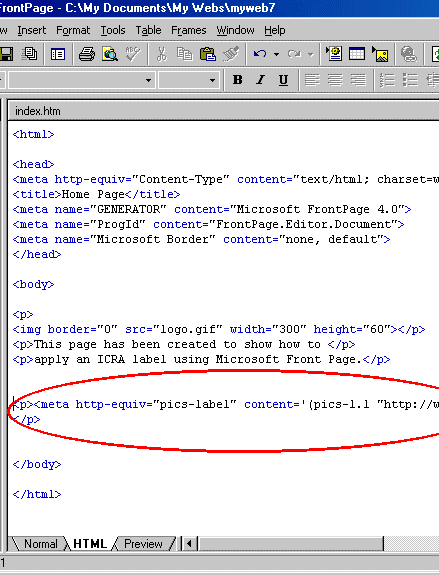
Front Page puts its own tags either side of the ICRA label you've just inserted which effectively say "I don't know what this is but the author just stuck it in there so I'd better leave it in." These are colour coded grey and need to be removed in order for the ICRA label to work. Just delete the <!--webbot bot="HTMLMarkup" startspan --> and |
|
Here's the clever bit
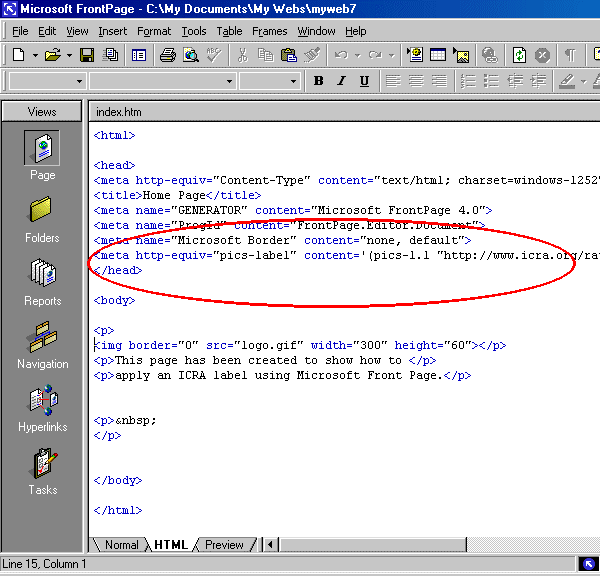
Now click the Normal tab at the bottom of your Front Page window, then go back to the HTML tab. Front Page has recognized that the ICRA label is in the wrong place and has moved it to where it should be - in the <head> section of your page as shown below. Smart. |
|
Just check that... the label should be on a single line, just above the <head> tag. It should look identical to the text in the e-mail we sent you.
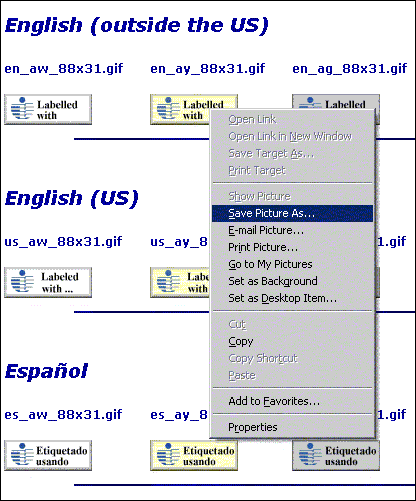
Now go back to the Normal view and we'll add the ICRA logo button (remember this is optional!) A variety of ICRA logo buttons area available from a special page on the ICRA web site which you can access here. Choose the button (and the spelling!) which best suits your site and save it to your hard drive by pointing at the logo button you want and RIGHT clicking. Choose Save Picture As (see below) |
|
Save the logo button in the images folder Front Page has created for you in your web.
Now you can add the logo button wherever you wish in the normal way, so either click Front Page's insert picture button or click Insert > Picture > From File, then open the images folder. In this demonstration case there are 2 images in this folder, the ICRA logo and the button I've just downloaded. See below: |

|
Click OK to insert the logo button.
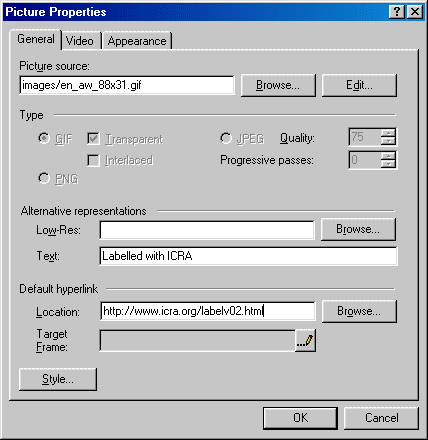
To link this back to the ICRA web site, please then Right click on the logo button and select Picture Properties from the menu. This will bring up the dialogue box shown below: |
|
Please fill in the two text boxes as shown. The first one is the text a visitor sees in the space the logo button occupies before it loads and the second box is the special url we have set aside for just this purpose. Please note that that's zero two, not oh two! Visitors who click the logo button will be taken to the About ICRA page on our site, although in future, we may add additional features to this url.
I would recommend that you click the little pencil button to the right of the "Target Frame" line and select New Window. That way the ICRA web site will be displayed in a new window of its own and not take visitors away from your site. Click OK, and that's it! Now you can get on with the rest of your site. Once you've uploaded your site to the internet, you should be able to test the ICRA label. Set up Internet Explorer's Content Advisor and make sure you have chosen not to allow access to unrated sites. Then visit your own site and you should be allowed in according to the rating you applied. See the Content Advisor set up page here if needs be. If you are still having difficulty... ... I'm afraid we are unable to troubleshoot every web site! Hopefully there is sufficient information here and in the more general walk through for you to enjoy success! If we can help we will, however, it is usually much easier, quicker, less frustrating and more pleasant to stock up on beer/wine/chocolate/coffee and ask a (computer confident) friend over! Return to FAQ Index
|